I like Keycloak a lot.
A single place to manage your authentication for many systems that you can use to federate users from an existing directory of users.
For more information look at my Keycloak Essentials Summary or the official Keycloak documentation
There are a host of benefits but mainly it lets applications focus on their goals and not be distracted by the complex task of authentication.
If you are making use of keycloak and vault in your environment, then I would say it is worth looking at providing auth into vault via keycloak. Even if your users are in directory that can be accessed with LDAP – federating those users with keycloak and using OpenIDC auth is better than directly using LDAP – as credentials will be entered into only a single place ever.
Before jumping in, it is worthwhile taking a look at Vault1.1: OpenIDC with vault youtube tutorial
Key terminology:
- Claims: key/value pairs in the JWT id token – a OpenIDC JWT term
- Client Scopes: A keycloak term, tedious to configure protocol and role scope mappings for each client. These are shared scope mappers. By default the
SAMLclient uses theroles_listandopenidchasprofile, email, address, phone, offline_access, roles, web-origins and microprofile-jwt
Prerequisites
Ensure you have setup the following:
- keycloak (I used version 9.x)
- Vault 1.1 or higher (I used Vault v1.3.4)
Getting Started
Keycloak Client Setup
Hashicorp provides decent docs and have a section on setting up your OIDC provider. We will use that to set up the hashicorp client in your keycloak realm.
- Log into keycloak and use the correct realm
- Create a client
- Client Protocol: openid-connect
- Access Type: confidential
- Standard Flow Enabled: On
- Configure Valid Redirect URIs
- Make note of the Client ID and Secret
Also ensure that valid redirect URL’s are used:

https://:8200/ui/vault/auth/oidc/oidc/callback,
https://:8250/oidc/callback
Vault Info
Vault provides information about the JWT/Open ID Connect auth method.
A JWT (said jot) is a JSON web token – this is a token containing authentication information that is signed by the identify provider – made available to the client.
That is how the client knows the identity of the user.
Vault allows login using the authorization code flow (via browser) with keycloak – or direct entry of the JWT.
Key Concepts
Remember that sometimes we want to maintain order and not just authorize any user on keycloak to login. In that case, Bound Claims are used.
These are the required keys and values expected to be in the JWT in order for that JWT to be authorized.
For example only user’s with the attributes in the client scope of the JWT like the following:
{
        'department': 'implementations',
        'region': 'za'
}
Are allowed in.
Apparently the mapping is done on vault side with claim_mappings…and this must exist in the JWT other wise auth fails.
Note: the metadata key name "role" is reserved and may not be used for claim mappings.
Redirect URI’s
Different from other integrations – vault requires setting the redirect URI. On other integrations usually you just set the OpenIDC endpoint…but in vault’s case you need to set the redirect urls correctly as well.
The allowed_redirect_uris is specified per role.
If you plan to support authnetication via vault login -method=oidc, then a localhost redirect must be set http://localhost:8250/oidc/callback.
If you are allowing logging in via the vault ui you would use https://{host:port}/ui/vault/auth/{path}/oidc/callback.
The example given is: https://vault.example.com:8200/ui/vault/auth/oidc/oidc/callback?namespace=my_ns
So I am assuming this redirect url is the one on the vault side?…we’ll figure this out
Logging in Via UI
Once everything is setup the login with openidc should look like this:

More info in the docs…on login via CLI and troubleshooting
Vault Setup
I am following this tutorial: Tutorial for Implementing OpenIDC Access
Ensure you have all the required details on hand:
- keycloak baseurl (or realm url)
- client-id
- client-secret
Create the Policies for the Demo
Every client token has policies attached to it to control its secret access
Create a secret reader and a secret manager policy:
manager.hcl:
# Manage k/v secrets
path "/secret/*" {
    capabilities = ["create", "read", "update", "delete", "list"]
}
reader.hcl:
# Read permission on the k/v secrets
path "/secret/*" {
    capabilities = ["read", "list"]
}
I’m going to do most of this stuff using the UI – but as always with vault you can use the API or the CLI as well
- Go to
https://<yourvault-instance>:8200/ui/vault/policies/acl - Click
Create ACL policy - Upload the files, or just paste the contents of the
.hcl‘s above
Enable OIDC Auth Method
- In the Web UI, select Access
- Slick
Enable new method - Select
OIDC - Enable method
- In configuraton add the
OIDC discovery URL:https://<keycloak-url>/auth/realms/<realm> - Enter
readerin theDefault_rolefield - Add the
client-idandclient-secretin theOIDC optionstab - Save
Now a reader role needs to be created that binds the client and sets the allowed redirect urls:
vault write auth/oidc/role/reader \
        bound_audiences="" \
        allowed_redirect_uris="http://:8200/ui/vault/auth/oidc/oidc/callback" \
        allowed_redirect_uris="http://:8250/oidc/callback" \
        user_claim="sub" \
        policies="reader"
All the above should match the setup redirect url’s in keycloak.
From a keycloak perspective the discovery URL will always be the URL of the
endpoint configurationon the realm level…but with everything after and including/.well-knownremoved
Login with OpenIDC
Logout and then sign in with openIDC provider.
A popup will redirect to keycloak for auth, and then close when completed.

Creating the Role for the Manager on Keycloak
By default, users will be secret readers.
On keycloak create a new role and add a user to that group, call is kv-manager for example.
In keycloak – roles by default are added to the client scope – so clients can view the roles of a particular user with the JWT.
- To create a global role
Roles -> add Roleor a client level role got to the client androles - Add the
secret_managerrole - Optionally set other attributes
- Add a user to that role
Creating the Vault Manager Group
Concept: When you login, vault will see the roles claim groups_claim="roles" in the id token coming from the keycloak default openidc client scope. It is going to iterate over the list of values it finds. If it finds any that matches a group alias eg. secret_manager it will add that user to that group – if they are not already a member. As a result, that token they use to login with have that group’s policies included.
So we are using the role secret_manager on keycloak.
The manager policy has already been created.
The original role will be extended to add a groups_claim.
Then we create a vault (external) group – that is attached to the manager policy and save its id.
Then we create a group alias that is attached to that vault external group we just created – bound to the oidc authentication method that can have any named alias.
Create the External Group:
Create the secret_manager role
Looks like this has to be done via CLI
vault write auth/oidc/role/secret_manager \
        bound_audiences="" \
        allowed_redirect_uris="http:///ui/vault/auth/oidc/oidc/callback" \
        allowed_redirect_uris="http://:8250/oidc/callback" \
        user_claim="sub" \
        policies="reader" \
        groups_claim="roles"
I think the above policy should maybe be
manager, but will have to see
Create an external group named manager linked to the manager policy
vault write identity/group name="manager" type="external" \
        policies="manager" \
        metadata=responsibility="Manage K/V Secrets"
Retain the returned ID:
export GROUP_ID="17..."Now we need to link the manager group to the secret_manager role:
# Get the mount accessor value of the oidc auth method and save it in accessor.txt file
$ vault auth list -format=json  \
        | jq -r '."oidc/".accessor' > accessor.txt

# Create a group alias named "kv-mgr"
$ vault write identity/group-alias name="secret_manager" \
        mount_accessor=$(cat accessor.txt) \
        canonical_id="$GROUP_ID"
Try Login now
Now sign out and log in again.
Set the role as secret_manager and then login with OIDC Provider.
If everything goes according to plan, you should login and have the manager policies attached.
This was not the case for me and I got the following error:
Token verification failed. error validating claims: aud claim does not match any bound audience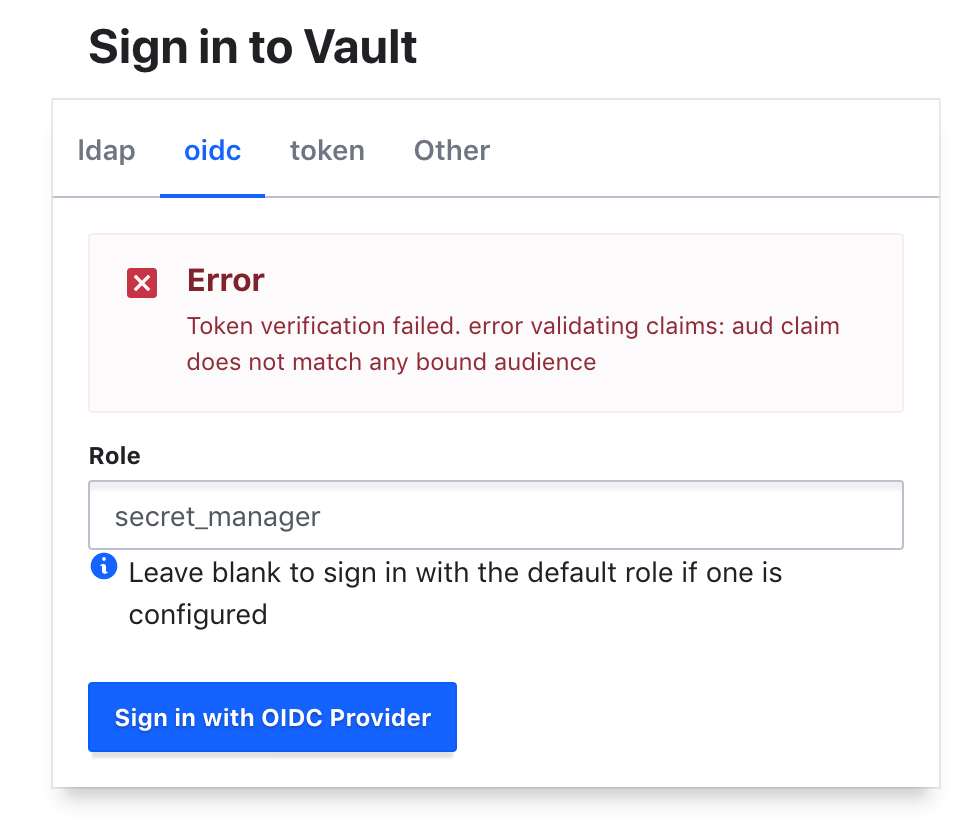
I think the reason for the error is because the roles claim is not found…so the id token returned from keycloak didn’t have the roles key in it.
Adding Roles to the ID Token
Addng the roles to the id token is done using a client protocol mapper
Remember vault uses the id token not the access token so the access token debug won’t be as useful –
You can debug the access token within keycloak by going to:Vault Client -> Client Scopes -> Evaluatethen use the secret manager user.
What you have to do is ensure that the client or realm roles is setup and added to the id token – you do that by going to the client mapper -> Add built IN and selecting the client or realm roles.
After that click the mapper and ensure Add to ID token is set to True.
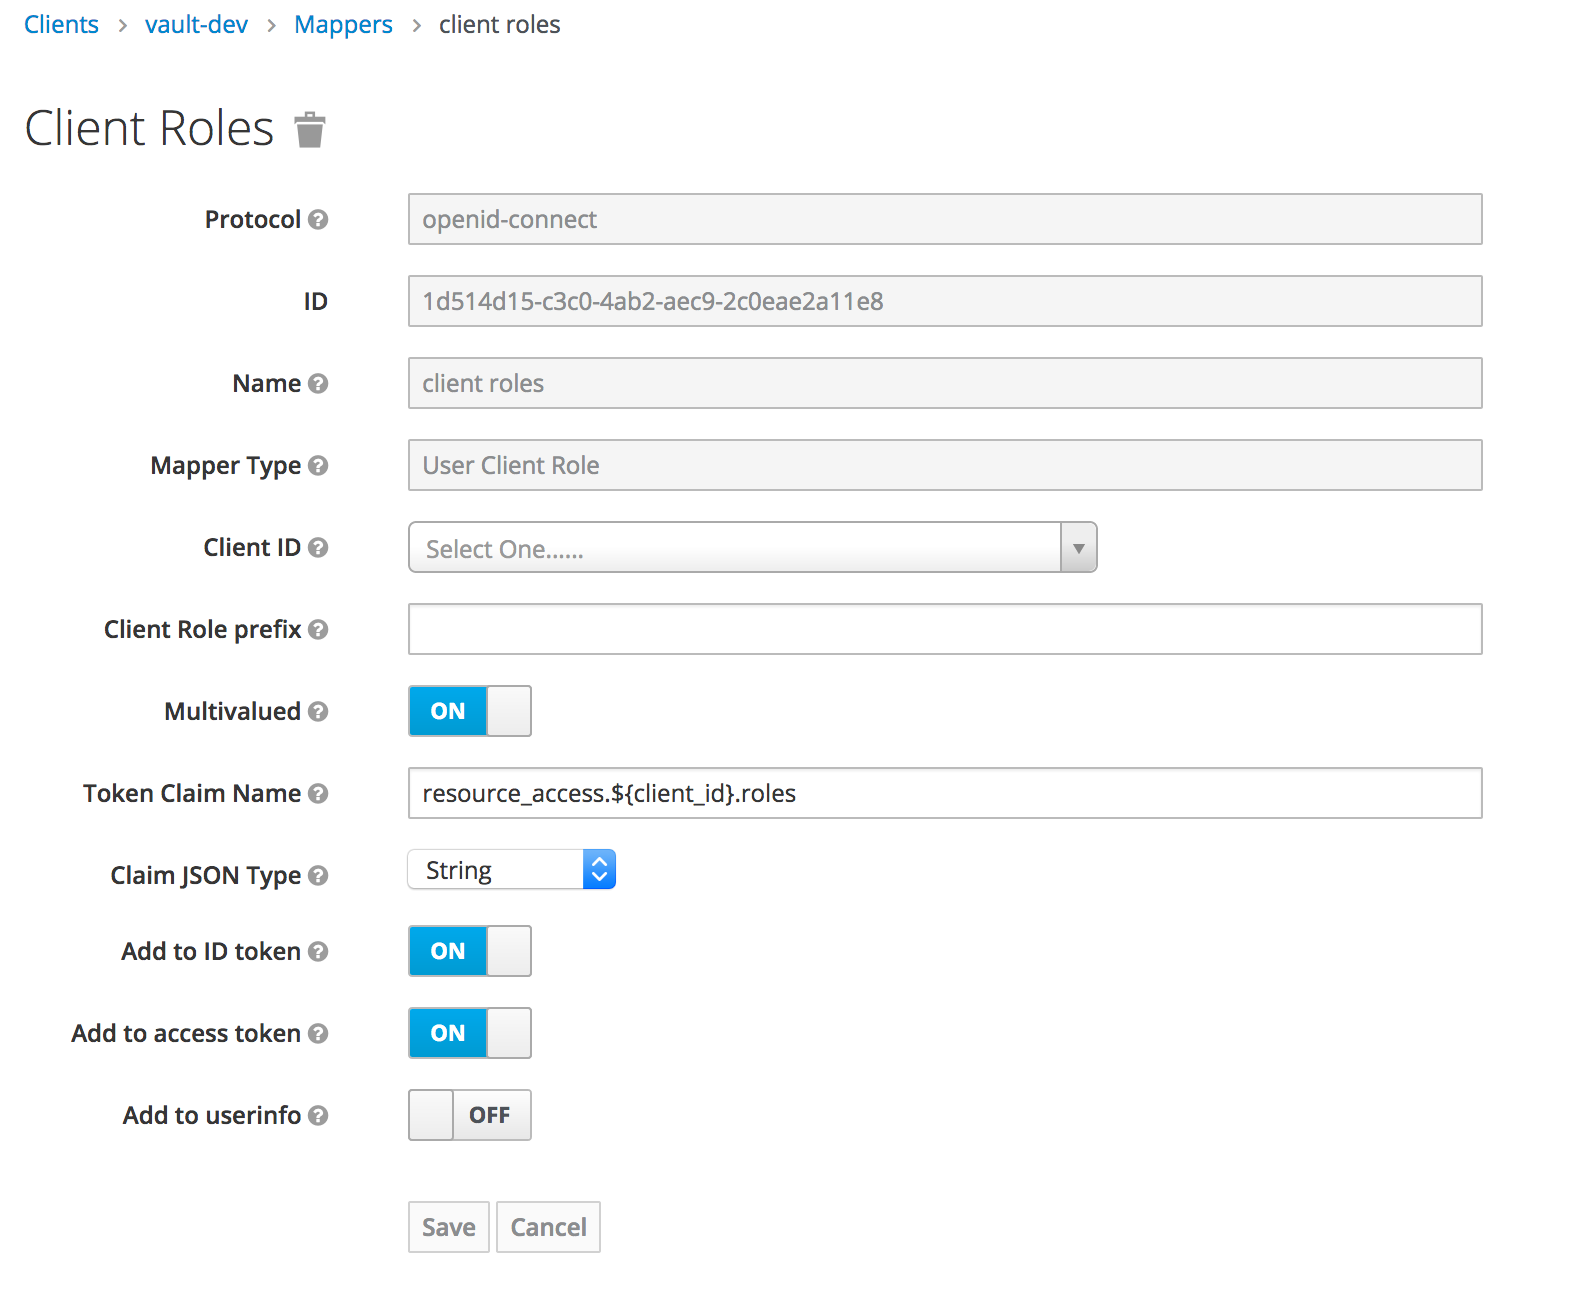
My role was on the id token but it looked like this:
  "resource_access": {
    "vault-dev": {
      "roles": [
        "secret_manager"
      ]
    },
So that is a few more levels deep than expected.
So with a nested groups claim, you can make use of a json pointer.
In this case:
"/resource_access/vault-dev/roles"vault write auth/oidc/role/secret_manager \
bound_audiences="" \
allowed_redirect_uris="http:///ui/vault/auth/oidc/oidc/callback" \
allowed_redirect_uris="http://:8250/oidc/callback" \
user_claim="sub" \
policies="reader" \
groups_claim="/resource_access/vault-dev/roles" So I update that, and try again – if you get this error it means the role was not found on the id token:
"/resource_access/vault-dev/roles" claim not found in tokenLogin Success
Now login should work successfully…
So a bit of extra work figuring things out but now things are looking good. I don’t really like the flow of having to specifify the role you want to log in as explicitly but I’m sure there is a reason for this.
As for the next steps, I want to figure out why you have to speciify the role to use when logging in. Why doesn’t vault get your associated roles and groups and apply the merged polcies. Perhaps that is the issue – if the roles conflict.
![]()